I have written a very simple headband pattern that I just had to share with you!
The Maya Headband!
AND it comes in two different options! A twist and a knot.
The Design
Here in Arkansas it doesn't get super cold but when it does it's nice to have something to cover your ears. I am not much of a hat person but I do enjoy a good headband. I wanted to create something that we would all love and want!
Sizing and Modifying
This headband pattern is written tutorial style with a lot of photos to assist you in modifying the design to fit your head. From newborns to adult. you can custom fit this pattern with just a measuring tape and some kindergarten math.
Make sure you can measure the circumference of your hat recipient’s head (or use the standard head circumference chart given by the Craft Yarn Council here)
The Yarn
The yarn I chose to use for this headband is I Love This Chunky Yarn by Hobby Lobby. I am a huge fan of Hobby Lobby yarn and I had a bunch of their ILTC yarn in French Lilac from when they had their huge clearance sale earlier this year.
I also love that it is a category 5 bulky weight yarn that has roughly 110 yd of yarn and with one ball you can make at least 2 headbands!
* Get the ad-free, large print, PDF pattern HERE* Add this pattern to your Ravelry queue HERE
To sum it up:
MATERIALS:
- I Love This Chunky Yarn by Hobby Lobby (Weight 5/Bulky - 3.5oz/110 yds)
- 1 skein any color (I used French Lilac)
- L/8mm Crochet Hook
- Measuring Tape
- Scissors
- Yarn Needle
GAUGE: 10 Sts by 8 Rows = 4 Inch Square
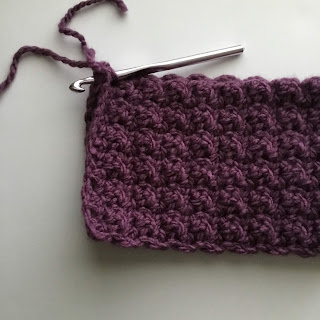
Create a 4 inch by 4 inch swatch square using DC in first stitch, followed by a SC in the next stitch, working your rows by chaining 1 and placing your first DC in the previous rows SC. Your swatch should be 10 stitches wide by 8 rows tall. If your swatch does not match this, you will want to use a different size hook. Use a smaller hook if your swatch is bigger than mine or a larger hook if it is smaller than mine. Just letting you know, I do crochet pretty tight.
KEY:
CH: Chain
Sl St: Slip Stitch
SC: Single Crochet
DC: Double Crochet
SPECIAL STITCHES:
Seed Stitch Stitch: DC in first stitch, SC in next stitch, and repeat across.
Seed stitch combines working single and double crochet stitches. Each row of alternating single and doubles is balanced on the following row by working singles into the top of the doubles and doubles into the top of the singles.
Skill Level:
Level 1 Beginner
Maya Headwrap Pattern.
DIRECTIONS:
CH 9/9/11/13
Row 1: DC in first CH, SC in next CH, (DC in next CH, SC in next CH) repeat across (8/8/10/12)
Row 2: CH 1 and turn, (DC in next st, SC in next st) repeat across (8/8/10/12)
Repeat Row 2 until you have 27/31/35/39 rows. The ribbing should measure approximately: 13, 15, 17, 19 inches long.
You can finish it off in one of two ways.
Option 1:
Take the ends of your headband and give it a twist.
Now take your sewing needle and yarn tail and whip stitch the ends together. Ta Da!
Option 2:
Take your short ends of your headband and lay them on top of each other. Now you will take your hook and Sl St the ends together.
Now we are going to take the two yarn tails and tie them together. So we are cinching the ends close to one another.
Now we will take the long yarn tail and wrap it around the middle many times to create a knot.
Once the knot is made, tie the ends on the backside and weave in your ends. Knot headband made!


Comments